Testing SOAP web services using SoapUI Pro - Part 2
Do the functional testing on your SOAP Web Services with SoapUI
In this post I will be discussing about performing functional tests on the SOAP web services by using SoapUI tool. I have already shown you how to create a SOAP web service project in my previous post. I will be using the same project which was shown in Part 1 of this blog posting. Before moving on, I would like to brief you about the tool which I am going to use in here.
There are many tools available in the market today to test web services. Even you can build your own stand-alone or web applications to test web services (the web service clients). SoapUI is a dominant product in the market which was developed by SmartBear community which helps on performing functional tests on the Web Services. SoapUI available as an open-source and a commercial version (the Pro version). You can download it from here as you wish (either you want to go for free version or the paid version. There are many additional functionalities available in the Pro version rather than free version). In this tutorial I will be using the Pro version to demonstrate the test cases (I was lucky enough to purchase a license). Also you could get the 14-day trial version of Pro edition if you just need to play around :-)
In this post I will be performing very basic level functional testing of SOAP web service.
Let's move on then...
[1] Getting the product -
First you must get the product as I have mentioned above in my description. You could download any of the SoapUI editions from this URL >> http://www.soapui.org

Download it and run the setup. Installation steps are common as any other software installations (I'm not going to go through the installation process because I hope everyone will know how to install a software), nothing special on this indeed.
Once you were ready with the tool, run the application. The initial screen will look something similar to this :-) May differ if you run some other versions. I am running the SoapUI Pro 5.1.2.

[2] Setting up the SOAP project -
Ok then, now lets set up a SOAP project with the SoapUI tool. To do this navigate to File --> New SOAP Project. You can see that there are some other new project options available. 'New REST Project' lets you create a RESTful Web Service project (another kind of a web service apart from SOAP which is out of scope for us in here) and 'New Generic Project' (lets you create a blank project and decide the type of the web service later on).
We are selecting 'New SOAP Project' because here we are playing around with SOAP web services and we already have the WSDL file which is the one we must provide to SoapUI tool to create the project.

When the New SOAP Project window pops-up, give a name for your SoapUI project and give the path of WSDL file (you also can provide the URL for your WSDL file if you have already hosted your web service project as I have described in previous post). Make sure you select the 'Create Requests' checkbox. This will create sample requests for your web service methods.
Click ok once all set.


In this post I will be discussing about performing functional tests on the SOAP web services by using SoapUI tool. I have already shown you how to create a SOAP web service project in my previous post. I will be using the same project which was shown in Part 1 of this blog posting. Before moving on, I would like to brief you about the tool which I am going to use in here.
There are many tools available in the market today to test web services. Even you can build your own stand-alone or web applications to test web services (the web service clients). SoapUI is a dominant product in the market which was developed by SmartBear community which helps on performing functional tests on the Web Services. SoapUI available as an open-source and a commercial version (the Pro version). You can download it from here as you wish (either you want to go for free version or the paid version. There are many additional functionalities available in the Pro version rather than free version). In this tutorial I will be using the Pro version to demonstrate the test cases (I was lucky enough to purchase a license). Also you could get the 14-day trial version of Pro edition if you just need to play around :-)
In this post I will be performing very basic level functional testing of SOAP web service.
Let's move on then...
[1] Getting the product -
First you must get the product as I have mentioned above in my description. You could download any of the SoapUI editions from this URL >> http://www.soapui.org
Download it and run the setup. Installation steps are common as any other software installations (I'm not going to go through the installation process because I hope everyone will know how to install a software), nothing special on this indeed.
Once you were ready with the tool, run the application. The initial screen will look something similar to this :-) May differ if you run some other versions. I am running the SoapUI Pro 5.1.2.
[2] Setting up the SOAP project -
Ok then, now lets set up a SOAP project with the SoapUI tool. To do this navigate to File --> New SOAP Project. You can see that there are some other new project options available. 'New REST Project' lets you create a RESTful Web Service project (another kind of a web service apart from SOAP which is out of scope for us in here) and 'New Generic Project' (lets you create a blank project and decide the type of the web service later on).
We are selecting 'New SOAP Project' because here we are playing around with SOAP web services and we already have the WSDL file which is the one we must provide to SoapUI tool to create the project.
When the New SOAP Project window pops-up, give a name for your SoapUI project and give the path of WSDL file (you also can provide the URL for your WSDL file if you have already hosted your web service project as I have described in previous post). Make sure you select the 'Create Requests' checkbox. This will create sample requests for your web service methods.
Click ok once all set.
Now you can see your SoapUI project with your web service methods and sample requests (requests here are the callers of your service methods which you've hosted somewhere. It passes requests to those particular methods and get the response back), in the Projects navigation pane of SoapUI.

[3] Playing around with the created project -
When u double click on your project you'll see a window with several tabs on it.

* Overview tab : gives brief information about your project, WSDL file, number of test suits and etc.
* Environment tab : is where your connections will be. You must mention the environment where your web services were hosted. By default it will take the localhost.
* TestSuites tab : shows all the test suits which you have created.
And in our scope we don't have to worry about the other tabs :-))))
[4] The Requests for the web services? -
Double click on the Request1 under sayHello method which you've got when you created the project.
As you can see here, this sample request will have some sort of a form. This form accepts values for the parameters/arguments of your web service method. You can directly provide the values to the parameter and test your method directly from here. But as for the best practices we don't do that. Instead, we create test suites to provide sample values to our methods' params and send requests to the web service wherever it was hosted.

[5] What are test suits -
A Test Suit in SoapUI is nothing but a module which contains all your test cases/test scenarios which you are going to perform over the web service functions/methods.
The easiest way to create a Test Suit is just right click on the sample request (which is Request1 in our example) and select 'Add to TestCase'.

Then you will get a pop-up which asks you to enter a name for your test suite. Once you click ok after giving the name, it again asks you to give a name for the test case (give it when it asks :-)).

After that it asks for the Request details. Just give it a name and keep the rest as default.

Now we have created a test case with a request from the web servicing method itself.
The other way of creating a test suite is as follows...

Now when double clicking on the new request, we'll be getting the same kind of form which we got before.

[6] Testing...Testing...Testing... -
Give a value in the above form field (in our example the web service method is accepting a only one String type as the parameter that's why it shows only one field). And then click on the green arrow which is there in the top left as shown below. Hooooraaah...We've received the response successfully. You can see the response in the right part of the screen of SoapUI. Our method has returned the response from the server successfully.
Tomcat Log (my web service was hosted in local Tomcat server as mentioned in previous post):-

SoapUI outcome:-
 You also can run several test cases at once. Just double click on the test suite and click on that green arrow (play button). This will execute all the test cases belongs to that particular test suite at once.
If you need to run all the test suits of the project at once, double click your project and go to TestSuits tab. And then click the same old green color play button. This will run all the test cases of all the test suits of the project.

It will be greener if the test cases got executed successfully, otherwise it will be red (failure).
[3] Playing around with the created project -
When u double click on your project you'll see a window with several tabs on it.
* Overview tab : gives brief information about your project, WSDL file, number of test suits and etc.
* Environment tab : is where your connections will be. You must mention the environment where your web services were hosted. By default it will take the localhost.
* TestSuites tab : shows all the test suits which you have created.
And in our scope we don't have to worry about the other tabs :-))))
[4] The Requests for the web services? -
Double click on the Request1 under sayHello method which you've got when you created the project.
As you can see here, this sample request will have some sort of a form. This form accepts values for the parameters/arguments of your web service method. You can directly provide the values to the parameter and test your method directly from here. But as for the best practices we don't do that. Instead, we create test suites to provide sample values to our methods' params and send requests to the web service wherever it was hosted.
[5] What are test suits -
A Test Suit in SoapUI is nothing but a module which contains all your test cases/test scenarios which you are going to perform over the web service functions/methods.
The easiest way to create a Test Suit is just right click on the sample request (which is Request1 in our example) and select 'Add to TestCase'.
Then you will get a pop-up which asks you to enter a name for your test suite. Once you click ok after giving the name, it again asks you to give a name for the test case (give it when it asks :-)).
After that it asks for the Request details. Just give it a name and keep the rest as default.
Now we have created a test case with a request from the web servicing method itself.
The other way of creating a test suite is as follows...
- Right click on your project and select 'New TestSuite' from the menu which appears.
- Then it will asks you to give a name for the test suite. Give it what it asks and click ok button.
- If you've noticed, this time it doesn't ask for the test case name and the request name. This is because here we are creating a blank test suite, which we need to add all the other stufs later. Not like directly creating a test case from a method's sample request (Request1) haaa...
- To create a test case, just right click on the newly created test suite and select 'New TestCase'. Give it a name and click ok.
- Our test case is ready. Now we need to create a request, to do that right click on that particular test case --> select 'Add Step' from the menu --> click 'Test Request'. Then we'll be getting the below pop-up window.
- Select the operation/service method for the test case and hit ok button. Give your request name and leave other's as default.
Now when double clicking on the new request, we'll be getting the same kind of form which we got before.
Let's do some testing now...
[6] Testing...Testing...Testing... -
Give a value in the above form field (in our example the web service method is accepting a only one String type as the parameter that's why it shows only one field). And then click on the green arrow which is there in the top left as shown below. Hooooraaah...We've received the response successfully. You can see the response in the right part of the screen of SoapUI. Our method has returned the response from the server successfully.
Tomcat Log (my web service was hosted in local Tomcat server as mentioned in previous post):-
SoapUI outcome:-
If you need to run all the test suits of the project at once, double click your project and go to TestSuits tab. And then click the same old green color play button. This will run all the test cases of all the test suits of the project.
It will be greener if the test cases got executed successfully, otherwise it will be red (failure).
[7] Test Assertions? -
SoapUI also provides facility to create test assertions on each requests.
Assertions are conditional statements which you can define for each of your test case requests. If the assertion fails then the test will fail. If you create multiple assertions for a test case request, then all those assertions must pass to pass the test case (to get the green signal).
SoapUI provides few built-in assert conditions which you can apply to your web service requests.
Creating Assertions in SoapUI
To create an assertion double click on a request which you want apply the assertion, click on the 'Assertions' tab which is there in the bottom of the screen as shown below. By default there will be one assertion which will verify whether the responses are valid. Now click on the small symbol which shown in below image.

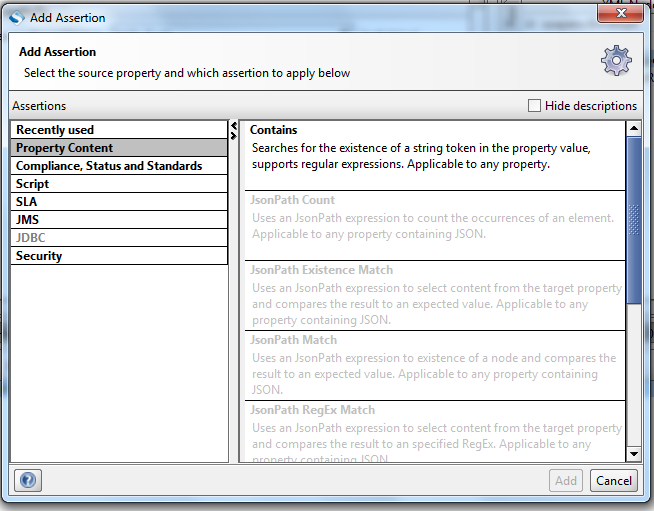
You will see the 'Add Assertion' pop-up and there you can select various types of available assertions (I am not going to discuss about all of them. My purpose is just to mention that the SoapUI is having such feature only).
SoapUI also provides facility to create test assertions on each requests.
Assertions are conditional statements which you can define for each of your test case requests. If the assertion fails then the test will fail. If you create multiple assertions for a test case request, then all those assertions must pass to pass the test case (to get the green signal).
SoapUI provides few built-in assert conditions which you can apply to your web service requests.
Creating Assertions in SoapUI
To create an assertion double click on a request which you want apply the assertion, click on the 'Assertions' tab which is there in the bottom of the screen as shown below. By default there will be one assertion which will verify whether the responses are valid. Now click on the small symbol which shown in below image.
You will see the 'Add Assertion' pop-up and there you can select various types of available assertions (I am not going to discuss about all of them. My purpose is just to mention that the SoapUI is having such feature only).
In this example I'm adding an assertion which will validate the Request messages which are having 'hello' text in the request message. To do this we need to select the 'Contains' assertion under 'Property Content'.
Click 'Add' button.
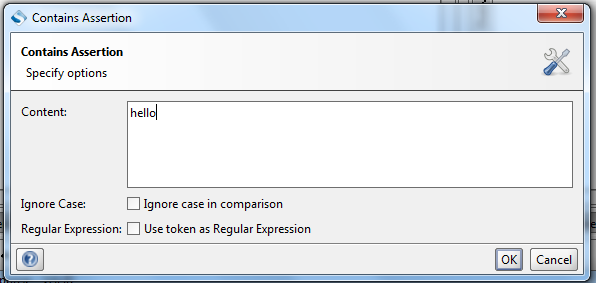
From pop-up, give the content which you want the server to validate from the request (I'm giving as 'hello' as I have mentioned above).
Hit ok button.
Now you'll have the assertion applied to your request. Your test case will fail if your request message doesn't contain the word 'hello'.
These are the basics of testing SOAP web services with SoapUI tool. This cool contains lot more other functionalities. As we have done this with the Pro edition, same processes will be followed in the open-source version of SoapUI as well.
ThAt's thE enD oF it... H0p!ng tO aDD m0r3 PosTs oN vaRioUs oTheR tEchNoloGies. ThaNks a l0t. SeE You sO0n !!!!!!!!!!!!

Comments
Post a Comment