Testing SOAP web services using SoapUI Pro - Part 1
A guide to develop code-first SOAP Web-Service with STS
This module is about creating a simple Java SOAP web service using Spring Tool Suite. This explains easy steps on how to develop a web service, deploying it on Tomcat server and do the integration stuffs. Main purpose of this post is to put the initial footstep for the ultimate target, which is Testing of SOAP web services using the SoapUI tool. Here I have used the default STS java ws framework to develop the project (Axis framework) and used Apache Tomcat 7.0 to deploy the project.
This post was mainly targeted the audience who are in beginner level for Java Web Services, but it is not limited to a specific group or people. Obviously you should have some programming knowledge to understand this, otherwise you'll be like lost in middle of the jungle.
Let's start with step by step...
[1] New Project -
Create new Dynamic Web Project under the workspace

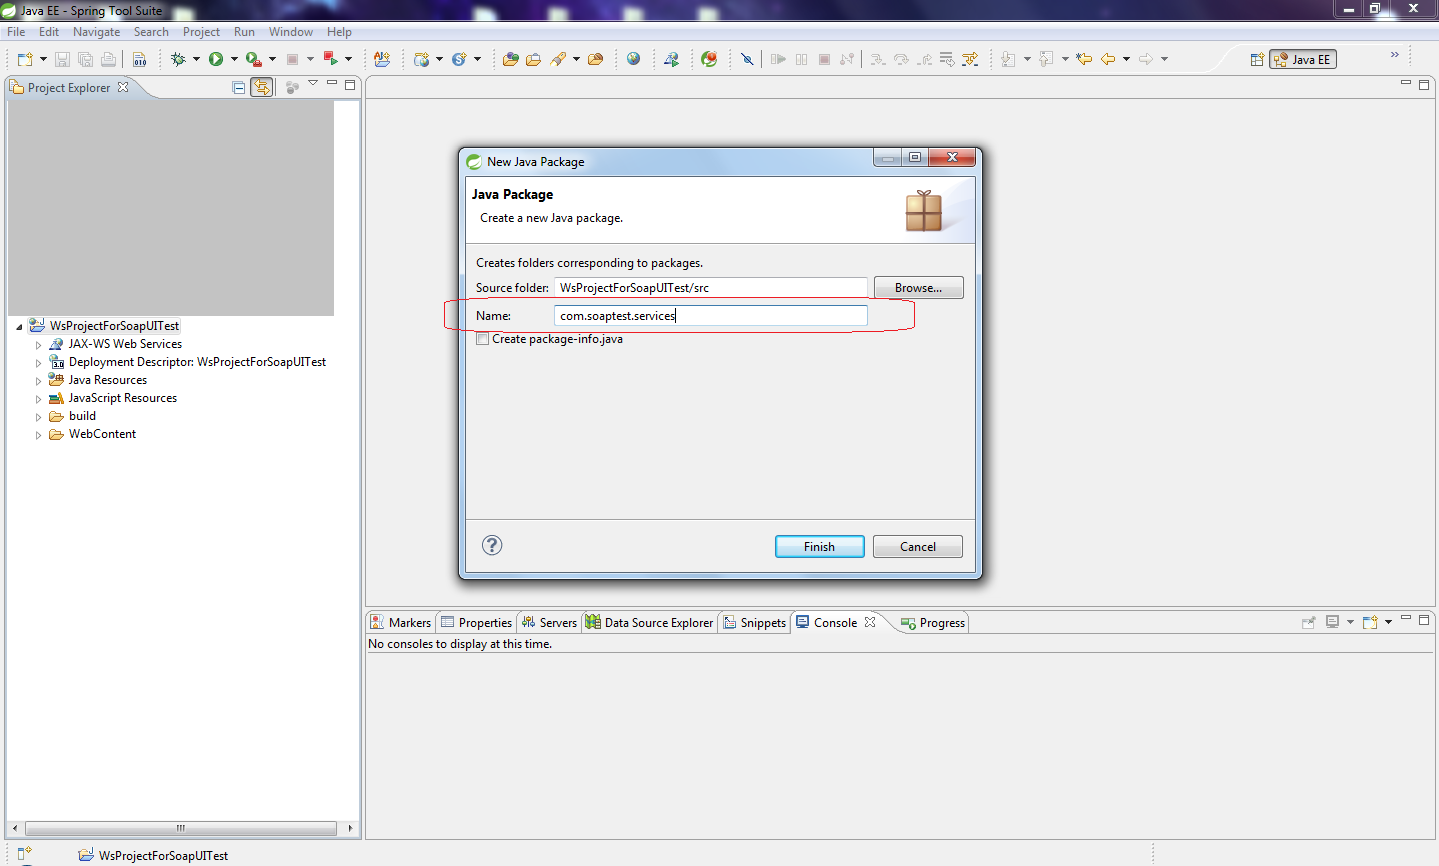
[2] New Java Package -
Create a java package to implement the relevant java source files for the web service. You can specify any name and the structure for your new package.
Create a java package to implement the relevant java source files for the web service. You can specify any name and the structure for your new package.
[3] Source codes -
For the web service, we'll be needing an interface and it's implementation class. In this example we'll be having only one web service method (just didn't want to make this a war-zone :-)). So, here we create only one interface and it's implementation class. I have created both of them in one package which I've created above, but it is not restricted to be as it is. You may create different packages for the interfaces and class files.
The interface will look like this (HelloRPC.java)

1:  package com.soaptest.services;
2:
3:  import javax.jws.WebMethod;
4:  import javax.jws.WebService;
5:  import javax.jws.soap.SOAPBinding;
6:  import javax.jws.soap.SOAPBinding.Style;
7:
8:  @WebService
9:  @SOAPBinding (style = Style.RPC)
10:  public interface HelloRPC {
11:
12:       @WebMethod
13:       public String sayHello(String messageFromClient);
14:  }
15:
The implementation class will look like this (HelloRPCImpl.java)

1:  package com.soaptest.services;
2:
3:  public class HelloRPCImpl implements HelloRPC {
4:
5:       @Override
6:       public String sayHello(String messageFromClient) {
7:            System.out.println("Client message was processed by the server...");
8:            System.out.println("Message from remote host: " + messageFromClient);
9:
10:           return "[response-message] Your message has being processed by the server. Your message was : "
11:                      .concat(messageFromClient);
12:       }
13:
14:  }
15:
I have used some annotations inside the interface and the class. Just forget them for now, I have explained them below :-)
(Java codes can be found in this githup public repository)
[4] Annotations' definitions -
In above example, you can see that I have used several annotations. Annotations are syntactic metadata which can be added to java classes, methods, variables and etc. (For more information about annotations, please refer to this Oracle doc)
In above example, you can see that I have used several annotations. Annotations are syntactic metadata which can be added to java classes, methods, variables and etc. (For more information about annotations, please refer to this Oracle doc)
@WebService
Marks Java class as a Web Service implementation, or a Java interface as defining a Web Service interface.@SOAPBinding
Describes the mapping of our Web Service onto the SOAP message protocol. It actually binds our WS object onto the protocol.'style' parameter of @SOAPBinding
The 'style' parameter of @SOAPBinding annotation defines the encoding style of the messages which comes in and goes out from the service methods. We have given the RPC encoding style which is to make-sure the message encoding for the Remote Procedure Calls.@WebMethod
When this annotation was used, the java method will be exposed as a Web Service operation. These methods must be declared as public. And if you didn't return any values from these methods, then there will not be any response messages/values for the client(s) from the server.
According to those above annotation descriptions, now you may have clearly guessed what our web servicing method would be. Of course, in our example it is easy as our class has only one method (our web service operational method is sayHello which accepts a string value from the client and returns a string to the client from the server).
[5] Generating the WSDL (Web Services Definition Language) file -
Now our rabbit is ready to hit the carrot farm :-)
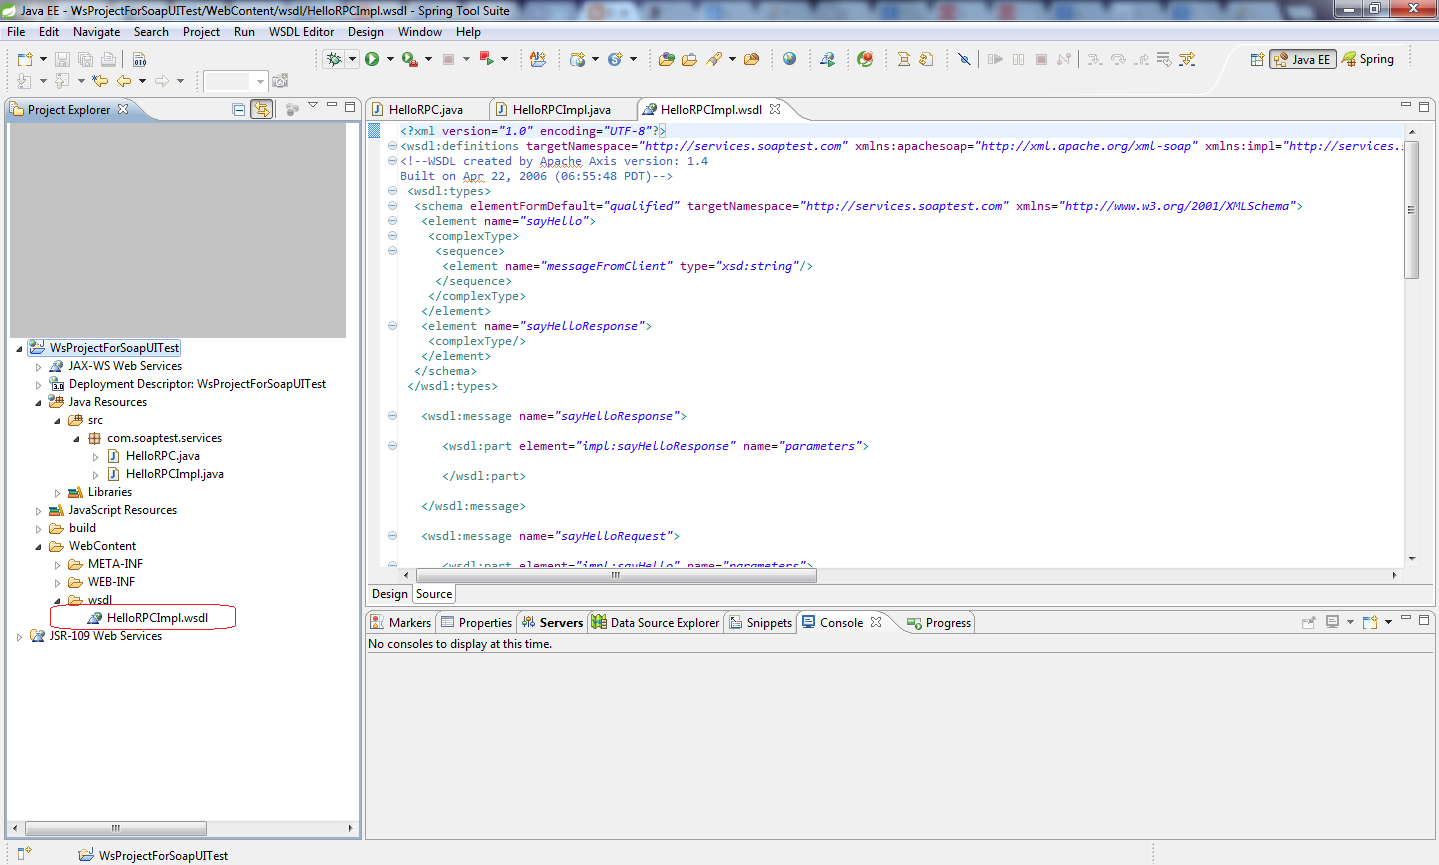
As our project is now all set to deploy, we need to generate our ever loving WSDL file now. This is the file which describes our web services and how to access them and about the connection and all. This file is written in XML language. To generate the WSDL file in STS please follow the steps shown below.
(Additional note: There are mainly two ways of creating a web service. One is code-first and the other is contract-first. Here we are following the code-first method as it mentioned in our title, which means we develop our java resources first and generate the contract/WSDL. In the contract-first method we create the WSDL first and then generate the java sources.)
Right click on the project and select new --> web service

Click Next button. And give your web service implementation class name (class name should be given with the package representation. It is far better if you just click the browse button and select your class name...lol...) in the window which pops-up.
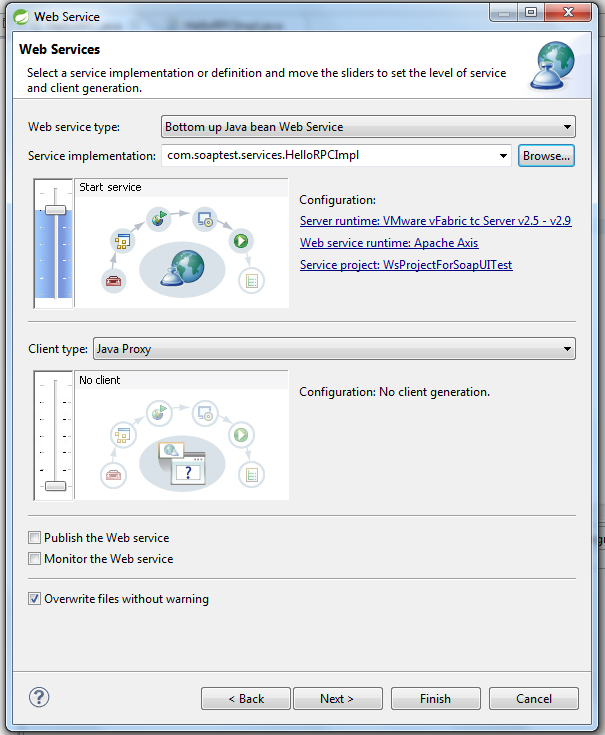
Hit the Next button and select your web service operational method(s) from the list.

Click Next and then when the 'Server Startup' screen appears click the Cancel button. This screen lets you to deploy in the default web server of your project inside the IDE itself (I mean which we gave as the Runtime Environment for our project when creating it).
In my case I will be deploying my project in an external Tomcat server. Because of this, I do not want STS to deploy my project in itself.
Now I have my WSDL file generated for my project.
[6] Compacting/packing the resources -
Wooow...Now we are almost done with our web service. I just have to deploy this on my server (I'm using Apache Tomcat server for this).
To deploy this on the Tomcat server, first I must generate the WAR file (WAR is the Web Archive which puts all your source codes into a package, something like a ZIP file :-). We then deploy this file in our server. The corresponding server will then extract this WAR file and gets the project structure back into its context).
To generate the WAR file, just right click on the project and under 'Export' menu select WAR. From the export window give the destination location where you want to save your WAR file. Then hit Finish button. That's all folks, now your WAR is ready.
[7] Deployment procedure -
To deploy the WAR file which I created above, first I must start the Tomcat server (double click the startup.bat file from the bin directory of Tomcat folder).
Once the server has started, navigate to Tomcat app manager portal through your browser. http://[server-host]:[server-port]/manager/html . Log-in using the Tomcat Manager credentials. Upload your WAR file in the below shown location.

If it successfully deploys the WAR, then we are ready to go.
[8] Finally... -
Our web service is functioning now. The method which I created can be accessed by any clients which supports web services (which can read the WSDL contract). To test the web service methods, we can create our own java or web clients. But instead we can find lot more web services testing tools in the market.
SoapUI is one such market tool which we can use to test our web service projects. In my next module I will be discussing about how to test SOAP web services using SoapUI tool.
Visit my next blog post to test this web service.
Now our rabbit is ready to hit the carrot farm :-)
As our project is now all set to deploy, we need to generate our ever loving WSDL file now. This is the file which describes our web services and how to access them and about the connection and all. This file is written in XML language. To generate the WSDL file in STS please follow the steps shown below.
(Additional note: There are mainly two ways of creating a web service. One is code-first and the other is contract-first. Here we are following the code-first method as it mentioned in our title, which means we develop our java resources first and generate the contract/WSDL. In the contract-first method we create the WSDL first and then generate the java sources.)
Right click on the project and select new --> web service
Click Next button. And give your web service implementation class name (class name should be given with the package representation. It is far better if you just click the browse button and select your class name...lol...) in the window which pops-up.
Click Next and then when the 'Server Startup' screen appears click the Cancel button. This screen lets you to deploy in the default web server of your project inside the IDE itself (I mean which we gave as the Runtime Environment for our project when creating it).
In my case I will be deploying my project in an external Tomcat server. Because of this, I do not want STS to deploy my project in itself.
Now I have my WSDL file generated for my project.
[6] Compacting/packing the resources -
Wooow...Now we are almost done with our web service. I just have to deploy this on my server (I'm using Apache Tomcat server for this).
To deploy this on the Tomcat server, first I must generate the WAR file (WAR is the Web Archive which puts all your source codes into a package, something like a ZIP file :-). We then deploy this file in our server. The corresponding server will then extract this WAR file and gets the project structure back into its context).
To generate the WAR file, just right click on the project and under 'Export' menu select WAR. From the export window give the destination location where you want to save your WAR file. Then hit Finish button. That's all folks, now your WAR is ready.
[7] Deployment procedure -
To deploy the WAR file which I created above, first I must start the Tomcat server (double click the startup.bat file from the bin directory of Tomcat folder).
Once the server has started, navigate to Tomcat app manager portal through your browser. http://[server-host]
If it successfully deploys the WAR, then we are ready to go.
[8] Finally... -
Our web service is functioning now. The method which I created can be accessed by any clients which supports web services (which can read the WSDL contract). To test the web service methods, we can create our own java or web clients. But instead we can find lot more web services testing tools in the market.
SoapUI is one such market tool which we can use to test our web service projects. In my next module I will be discussing about how to test SOAP web services using SoapUI tool.
Visit my next blog post to test this web service.

hi,we provide online training & video tutorial for soapui
ReplyDeletefor free videos refer
http://soapui-tutorial.com/soapui-tutorial/introduction-to-webservices/
Thanks Whizdom Trainings.
Delete